Here are some starting notes about how AutoBrew is put together. Part 1 is a list of the major components and where they can be sourced.
 Now that the machine side of the code has been published, here are some notes about how AutoBrew actually functions.
I plan to follow these notes up with some basic design and build documentation, including:
- a document onf ‘brewing with AutoBrew’ with photos of the machine
- a wiring diagram
- notes on parts and sourcing items
- design notes, including balancing liquor levels to help if you wish to design your own machine
enjoy, Arnie
how-autobrew-works (pdf)
While AutoBrew has been working for quite some time, that is not the same thing as working the way I think it should.
After using it for some time, it was time to redact the code – move it from spaghetti bits and gaffer tape to something revised from the ground up. I’m pleased to say that is done, and I’m happy to release a good working code base for the machine itself.
 Get the Photon code here
Release Candidate 1 (github)
Code notes
This code is for the photon only. It is currently all that is needed to run the machine automatically. A corresponding web app will be more elegant and easier to use, but the tooling from Particle still means that brewing is easy.
Particle console
The particle console has a log page that shows published events. AutoBrew publishes machine status in the following format:
$T575[0] 0s, Idle#
Txxx – temperature in degrees x10
[xxx] – target temperature in degrees x10
xxxs – clock time in seconds
program step [Idle, Mash1-5, Boil]
The line above shows that the machine temperature is 57.5 degrees and that the machine has no recipe running.
Particle App
This is available for ios and Android. I currently use this to control the machine.
The photon code has full notes for the control section.
To send a brewing recipe and then brew is simple.
First, send the recipe details:
R650,0;640,60;760,1;0,0;0,0;0,0;60;20,0,0,
The ‘R’ tells the machine this is a recipe.
650,0; – is the infusion step. Target is 65.0 degrees with no delay before starting.
640,60;760,1;0,0;0,0;0,0; – are five possible mash steps. Only two are used in this recipe.
- Mash at 64.0 deg for 60 minutes
- Mash at 76.0 deg for 1 minute
60;20,0,0, – are boil time and hop addition times. Boil is 60 minutes. Additions:
- 20 minutes
- 0 minutes
- 0 minutes
(Note: any unused hop addition has a time of 0)
Once the recipe is loaded, send the ‘r’ command to brew. A second ‘r’ will stop brewing.
That is pretty much all there is to it. I’ve simplified the machine since its first iteration. It no longer has a whirlpooling function and this has simplified controls and cleaning. I will update build details when I get the chance.
This machine reliably brews automatically without intervention between loading ingredients and starting, to the time wort is ready. I do not chill, so I fill a ‘cube’ at the end. A chiller could easily be added so wort could be transferred directly to a fermenter.
Web App status
I did have a running web app using an earlier version of photon code. This was an ugly hack and I wasn’t happy with it. I’m currently learning to code with Angular 2 and will use Firebase as a backend to store recipes.
The following sway was something I recorded as part of the process of refining the hop dropper design. It isn’t complete but gives an insight into how I went about it.
Just a few tweaks – the Prototyping journey
Posted: June 29, 2016 in Design, Documentation, UncategorizedI’ve put some notes together on the process of testing and improving the machine prototype. I’m nearly ready to settle on a final working design …
AutoBrew is a delight to use. It has now done four test brews and other than keeping a close eye on a new machine, it is truly hands free and simple to set up and clean.
As a prototype there are a few areas to address before the project is complete.
Refinements:
- improve function and simplify hop dropper
- the current dropper is oversized and the cups don’t mate well enough with the carousel surface.
- a smaller dropper driven by a servo will be more reliable and easier to maintain
- a dropper that fits into half the diameter of the mash tun top allows for a central chute and vent pipe to be installed. This improves appearance of the machine and possibly will improve liquor flow in the mash tun and therefore efficiency of the mash.
- the machine can be made more compact by having the hop dropper completely fit within the mash vessel
- improve mashing efficiency
- currently around 60%
- top down flow is too quick and channels without fully damping some parts of the mash
- test bottom up flow and float the mash
- improve mechanical connections
- multi-purpose chute to have a better mating system to mash tun
- hop dropper to mate to top of chute
- have two part top cover to allow dropper to remain in place while mash is inspected.
- software
- start delay is not functioning
- there is a bug to fix at end of hop drops – the carousel continues to drop rather than park
- level markings
- The pipe that supplies liquor to the mash done is ideal for some ruler markings showing how much liquor is in the kettle.
Ease of use:
This is way ahead of any machine I’ve used to date. Set up and clean up is at most half an hour. The rest is completely hands free. AutoBrew even sends an email at various points to remind me I’m brewing.
Next steps:
Once the prototype is working with greater reliability and efficiency, the project will be documented for hackster.io. I’m reasonably happy with the photon code, but the web app could do with a complete rewrite. It is ok to release as a functional starting point.
The machine is now a Photon away from its inaugural test run.
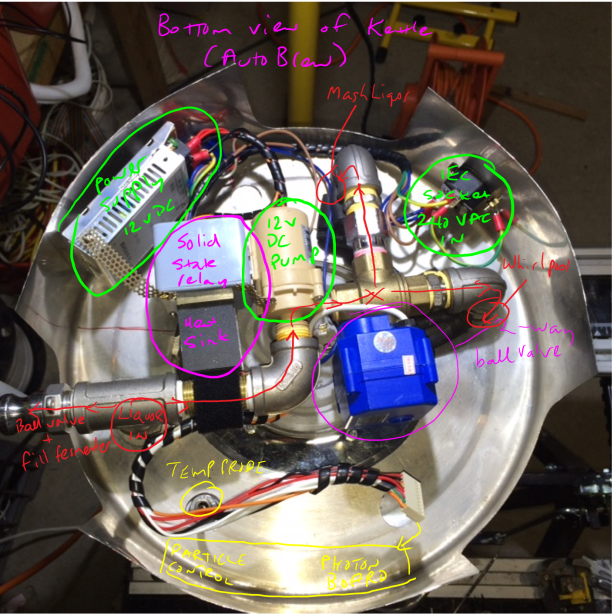 The image with the notes shows the guts of AutoBrew. The red notes follow the plumbing. Liquor primes the pump and will flow back into the kettle in a whirlpool motion, or via the other outlet to top flood the mash tun. A ball valve is opened at the end of boil to fill a no-chill cube (or a fermenter if desired). There is a concealed heating element in the centre of the vessel. On the underside it looks like a ceramic spiral that is partly visible under the pump, ball valve, and some plumbing.
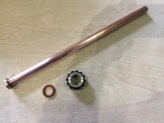 The kettle has two possible liquor flows depending on ball valve position. Mash liquor is pumped to the head of the mash tun via the straight pipe in the image at left. This is fabricated from copper to accept a Blichmann quick connector. John Blichmann assures me they are good inside a boiling kettle.
The other outlet returns liquor into the kettle in a gentle whirlpooling motion.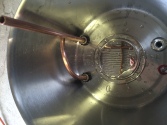
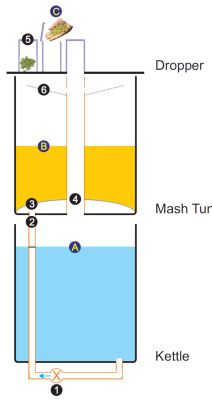
The image at left is inside the kettle. At 2 o’clock is the inlet for the pump. At 3:15 is the temperature probe. At 8 o’clock with the whirlpool return, and at 10 o’clock is the line extending upwards to the mash tun.
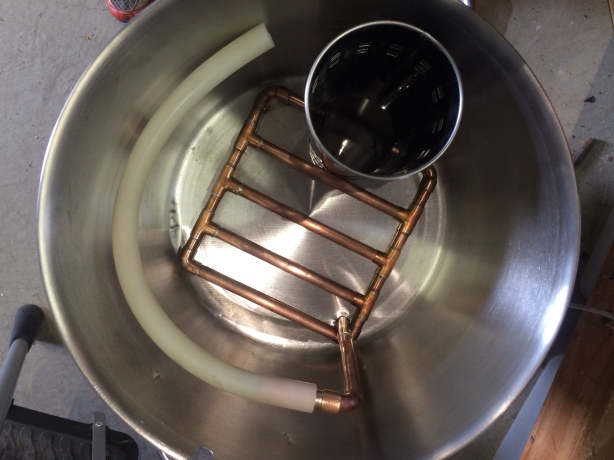
The image above is of the inside of the mash tun. This rests on top of the kettle. At 5 o’clock the mash liquor line rises up from the kettle. This continues upwards and then floods the top of the mash.
At the bottom of this vessel is a manifold (the ladder shape) with slots cut on the underside. Manifolds are often used in picnic cooler mash tuns. It does the same job as a false bottom. Liquor that flows into the manifold returns to the kettle via a drain at 1 o’clock.
At 1 o’clock there is a cylinder that extends most of the way up the mash tun. This serves a number of purposes. It provides a drop chute for hops from the top to enter the kettle. It also serves as a vent for the kettle. As mentioned previously, it also serves as liquor return from mash into kettle.
There are slots in this multi-purpose cylinder towards the top. This acts to prevent liquor overflows in the system. Liquor floods the top of the tun faster than it drains through the grains into the kettle. Any overflow returns via the cylinder to the kettle ensuring the system remains balanced.
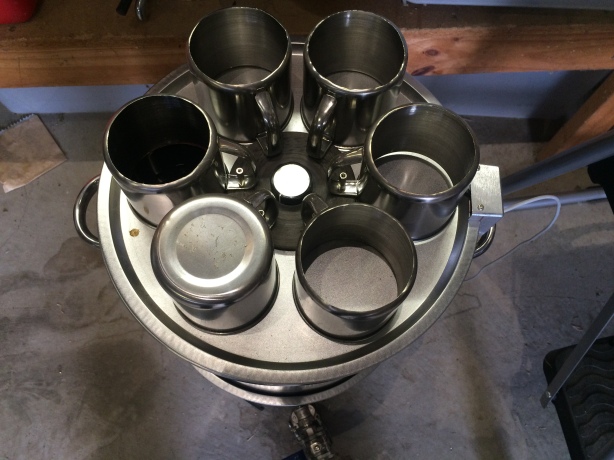
On top of the mash tun rests the hop dropper. This is a simple carousel with cups that align step by step with the drop chute. A micro-switch at 3’oclock ensures cup alignment. The cup at 7:30 is closed allowing for a park position. When parked, the kettle no longer vents. This is useful post-boil during whirlpool or chilling stages.
The machine is driven by a Particle Photon wifi connected device. A web interface via smartphone (or other device) allows for recipe storage and automatic brewing.
To brew with AutoBrew, liquor, grains and hops are loaded along with a brewing recipe. Once brewing has started, no intervention is needed until time to fill a no-chill cube.
The machine has been a couple of years from concept to this point in my spare time. It is about a week away from testing although the parts have all gone through proof of concept.
It goes without saying, I’m a happy brewer! Cheers!
I’m finally finding some good build time after months of distractions. Most of the fabrication of the new machine is done. I’m currently building the wiring loom to connect all the bits which means it is about two weeks from a test brew.
I’m not great at documenting things – I’m more artist than technician. I’ll post pics and notes about how it all works once I’ve done a proof of concept. That includes sharing the code.
I’ve been catching up on things as January is that time of year to take a breath and tie up loose ends. It means I have more time to research, more time to tidy, more time to be creative.
I’ve often blogged about good UI design. I discovered the other day that there is a difference between UI and UX.
A user experience runs far deeper than a nicely laid out user interface. I realise that without knowing I’d coded for UX 20 years ago to mitigate the pain of scheduling time against working accounts. UX won over UI back then, although my part was intuitive. There are formal terms like inside out and outside in that I’ve been discovering of late. They help consolidate the work towards a good web app for AutoBrew.
To be honest, I’m a bit embarrassed to discover this so late in the piece. I’m grateful to Luke Wroblewski for book and youtube seminar on the concept.
So watching the youtube above, I’ve realised that I have some work yet to do on my UI to make it a good UX. All part of the learning, and thankfully the improvements are actually easier to code than problems I was creating for myself.
Happy New Year and festive brewing to all.
I’m pretty happy now with how the UI and AutoBrew machine play together. During January I hope to make things work a little more smoothly and get the hardware build to the point of brewing beer with it. That means that I should be able to release some code for both Photon and web interface within a few weeks.
This stuff is built from the ground up so it does not bear legacies of copying the Braumeister machine, or the somewhat muddled UI of Open ArdBir.
So time for a look at the web app.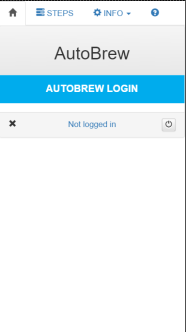
The top menu shows that the ‘home’ screen is selected. The large print ‘AutoBrew’ is shown until a recipe name from a connected device is loaded. The status shows that we are not logged in.
Other pages available from the top tab navigation are ‘steps’ (for recipe loading, saving etc.), ‘info’ which has options for ‘settings’ like temperature unit, boil temperature trigger and similar, and ‘fleet’ control which shows which devices are online and loaded with the AutoBrew software.
The login prompt only shows if we have not logged in before, or if we have specifically logged out. Clicking the login button prompts the user for email address and password. These are associated with a spark/particle account and devices that have been claimed to that account.
Assuming account and credentials match up, the app will connect to the first available AutoBrew device. If the device has valid recipe information stored, the recipe automatically loads. The home screen will display the recipe name and machine status. The ‘steps’ page will show all the recipe steps and allow editing, loading, saving of alternate recipes.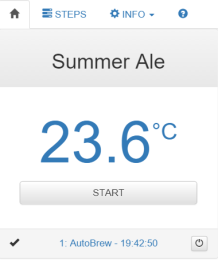
The home screen will show a ‘tick’ on the footer left when connection is good, and show which device tab is active, including device name and time of last update. At the footer right is a power off option to quickly shut down the machine.
Under the recipe name, machine temperature is shown. The button below shows the status and pressing the status button allows options to start or change targets of time or temperature on the fly.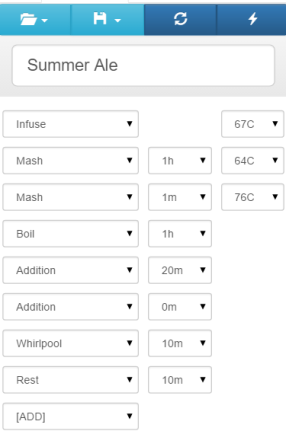
To start a brew, a recipe is loaded and ‘start’ on the home page is pressed. A recipe will be stored between sessions, so assuming a different recipe is needed, the ‘steps’ tab is pressed. This reveals the detail of the current recipe and options for creating new ones, or loading saved ones, updating steps to AutoBrew or retrieving a recipe from AutoBrew.
At top of screen, the ‘open’ button allows the loading of saved recipes. A new recipe can be saved in an existing or new slot via the ‘save’ button. The next button is to ‘refresh’ or get a recipe from AutoBrew. The final button is to ‘flash’ the steps on this tab to AutoBrew.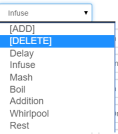
A recipe includes a number of functional steps available via the left most drop-down menu. The ‘add’ option will insert a step before the current one, and ‘delete’ will delete the current step. If ‘delete’ is selected on the final line it clears the entire recipe.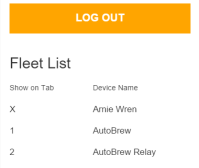
The ‘info-fleet’ view is useful for showing the status of your AutoBrew devices. In the example, the first device listed is online but not loaded with AutoBrew code, so is shown with an ‘X’. An AutoBrew device that is offline will also show with an ‘X’. Tabs on the main screen can be used to switch between active devices. This means that a number of machines can brew simultaneously. One of the features of AutoBrew is that it will literally brew without intervention. The UI is only really needed to load it with the right steps and set it going.
Back on the ‘home’ tab the machine is started and adjusted as needed while brewing. Brewing can be as simple as
- load recipe and ingredients
- press start
- come back to fill cube/fermenter after brewing
Or if you like to tinker, steps can be added or changed on the fly either via the ‘steps’ tab or more simply via tools on the ‘home’ tab.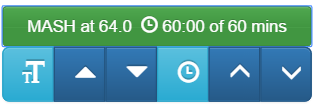
Clicking on the ‘status’ button reveals a target panel (four blue buttons) for both temperature and time. The lighter blue buttons change the step size of the particular target. The filled in up/down arrows (in this case buttons 2 and 3) indicate the step size is large step, while the right buttons show that small steps are active. In the example image, clicking on the up arrow for temperature (second from left) will change the status button to ‘MASH at 74.0’. The clock adjustments in the image would be in one minute steps. Small temperature steps are 0.5 degC or 1 degF intervals. Large steps are in 10 or 20 degree steps respectively. Small clock adjustments are in minutes, large adjustments in tens of minutes.
A click back on the ‘status’ button will close the target panel and send the new targets to AutoBrew.
A press of button ‘2’ changes active machine
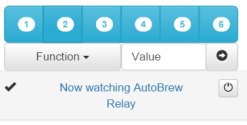
A click on the home tab footer (device name and update time) opens a tab and control function bar. The buttons from 1 to 6 allow quick selection between AutoBrew devices. The fleet tab will show which devices are active and their tab numbers. If a device is available on the tab, it will switch to that machine and show machine specific information. It is currently possible to use the web interface to brew simultaneously with six machines.
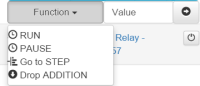 The ‘function’ drop-down provides quick access to useful supplementary commands and the ‘value’ box can be used to send a wide array of commands to AutoBrew. The button to the right with the arrow sends the command to AutoBrew.
Finally a machine can be shut down quickly by pressing the ‘power’ button at the footer right. A confirmation screen then pops up and if confirmed the machine shuts down immediately.
I’ve had a lot of fun designing this machine. There remains some hardware build to do and then work on fine-tuning the software, but I’m delighted with progress to date. I welcome your comments and look forward to sharing code with you soon.
